Содержание:
- What Are Telegram Mini Apps?
- Application Development Workflow
- Development Environment Setup
- Preparation for development
- Development of a mini-application
- Debugging and Testing
- HTTPS Requirements and Deployment Considerations
- How do I add a mini-app to Telegram?
- Promotion of a mini-application with AdsGram
Telegram Mini Apps represent a powerful platform for developing web-based applications that integrate directly into the Telegram messenger. This guide provides a complete walkthrough for creating your own Mini App – from initial setup through deployment and monetization with AdsGram.
What Are Telegram Mini Apps?
Telegram Mini Apps are web applications that run within the Telegram interface, providing users with interactive experiences without requiring app store downloads or external installations. Built using standard web technologies, they offer developers:
- Direct access to Telegram’s 800M+ user base
- Native integration with Telegram’s UI and features
- Cross-platform compatibility (iOS, Android, Desktop, Web)
- Simplified distribution through bot links and menu buttons
Application Development Workflow
The creation process consists of three core phases:
- Bot and Mini App Registration – Configuring your Telegram bot and Mini App entity through BotFather
- Application Development – Building your web application using frameworks like React, Vue, or vanilla JavaScript
- Deployment and Integration – Hosting your application and connecting it to Telegram’s ecosystem
This article provides step-by-step instructions for each phase, including development best practices, testing strategies, and monetization opportunities through AdsGram’s specialized advertising platform for Telegram Mini Apps.
Development Environment Setup
Before starting development, it’s essential to establish a proper development environment. Following industry best practices means never developing Mini Apps directly in production. Instead, use Telegram’s Test Environment to ensure safe, efficient development without affecting real users or production systems.
Understanding Telegram’s Test Environment
Telegram provides a separate Test Environment specifically designed for development and testing. This isolated environment mirrors production functionality while offering key advantages: HTTP protocol support (eliminating SSL certificate requirements during local development), direct IP address access without domain names, and complete isolation from production bots and real user data.
Production vs. Test Environment
| Aspect | Production Environment | Test Environment |
| URL Requirements | HTTPS only (valid SSL certificate) | HTTP and HTTPS supported |
| Domain | Full domain name required | IP addresses allowed |
| Data | Real users and data | Isolated test data |
| Use Case | Live applications | Development & testing |
Switching to Test Environment
For Telegram Desktop, open Settings → Advanced, enable Experimental settings, select Use test server, and restart. On mobile (iOS/Android), navigate to Settings → Data and Storage, tap Use Test Backend 10 times, enable the toggle, and restart the app.
Note that test accounts are completely separate from production accounts. You’ll need to create a new test bot using BotFather in the test environment.
Development Workflow
During active development, always use the Test Environment with HTTP and local servers for faster iteration. Before production deployment, set up HTTPS hosting with valid SSL certificates and test your application in the Test Environment first. Only deploy to Production when your application is fully tested, you have production-grade hosting, and all features (including AdsGram integration) are configured.
This separation ensures your development process is professional, safe, and efficient – allowing you to build confidently without risking production stability.
Preparation for development
This stage determines how convenient and useful your application will be. Don’t worry, the process is quite simple, and even if you have no experience, you can figure it out. You’ll learn how to build effective mini-applications from scratch.
- Defining the purpose of the mini-application
First of all, think about why you need a mini-application. It can be:
The game is designed to entertain users and increase engagement. A useful tool (for example, a calculator, translator, or task scheduler). A service for communication (for example, a bot to help clients or an automated FAQ).
It is important to understand what problem you want to solve with your mini-application. The clearer the goal, the easier it will be to develop its structure and functionality.
- Choosing the development platform and technology
Now that you have decided on a goal, it’s time to choose what you will develop your application on. Here are some popular options:
JavaScript is an excellent choice if you know basic programming. You can use it to create a web app that runs smoothly in the Telegram ecosystem. Telegram provides excellent support for this technology, and it is quite convenient for a quick start. React. It is a library for creating user interfaces. It is great for developing mini-applications, as it simplifies the creation of components and user interaction. Other web technologies. You can also use HTML and CSS to create the interface of your application. These basic elements will help make your project visually appealing and functional.
Don’t be afraid to experiment. If you have experience with other frameworks or libraries, try them out. The main thing is that they support integration with Telegram’s ecosystem and open network protocols.
Creating Your Bot and Registering Mini App
To create a Telegram Mini App, you must first set up a Telegram bot through BotFather –Telegram’s official bot management tool. BotFather acts as the central administrator for all bots and Mini Apps on the platform.
Setting Up Your Bot
Open Telegram and search for @BotFather. Start a conversation and use the /newbot command. BotFather will guide you through providing a display name and unique username (must end with “bot”, e.g., MyCoolMiniApp_bot).
Upon creation, BotFather provides an authentication token –store this securely in your environment variables, as it grants full control over your bot.
Registering Your Mini App
Use the /newapp command in BotFather to register a new Mini App and link it to your bot. Provide the app’s short name, description, and icon. Your Mini App receives a direct link: https://t.me/{bot_username}/{app_short_name}.
Menu Button vs. Direct Link: Choosing Your Integration Method
Telegram offers two distinct ways to make your Mini App accessible, each serving different purposes.
| Aspect | Menu Button | Direct Link |
| Access Method | Via bot menu button in chat | Shareable URL t.me/{bot}/{app} |
| User Flow | User starts chat with bot first | Direct access, no bot conversation needed |
| Visibility | Always visible in bot interface | Requires URL sharing or discovery |
| Best For | Apps extending bot functionality | Standalone apps, viral sharing, games |
| Discovery | Through bot search | Links, QR codes, marketing campaigns |
Menu Button Integration
The Menu Button appears at the bottom-left of the chat interface when users interact with your bot. This method creates a seamless experience where your Mini App feels like a natural extension of bot functionality.
Setup: Send /setmenubutton to BotFather → Select your bot → Provide your web app URL (HTTPS required in production) → Enter button title.
Ideal for: Bot-integrated apps, personalized dashboards, customer support tools, apps requiring conversation context.
Direct Link Integration
Direct Links create standalone Mini Apps accessible via shareable URLs without requiring bot interaction first. Perfect for independent applications that benefit from viral distribution.
Setup: Send /myapps to BotFather → Select your Mini App → Click “Edit Web App URL” → Enter your URL (HTTPS required in production).
Ideal for: Standalone games, e-commerce stores, utility tools, viral applications, marketing-driven apps.
Making Your Choice
Choose Menu Button if your app complements bot commands or needs conversation context. Choose Direct Link if your app works independently and benefits from direct sharing. You can also implement both methods simultaneously—use Menu Button for bot users and Direct Link for new user acquisition and viral growth.
Regardless of method, ensure your URL uses HTTPS with valid SSL in production (HTTP only in Test Environment). Both configurations support AdsGram integration for monetization.
Development of a mini-application
To develop your TMA, you can use different frameworks, such as React, or create an application from scratch using web technologies and Telegram’s services. Whether you’re building a simple bot or a complex interactive app, this step-by-step guide will help you through the process.
These are web applications that run directly within the Telegram interface, offering users smooth experiences without needing to visit the app store.
Remember, everything is not as difficult as it may seem at first glance.
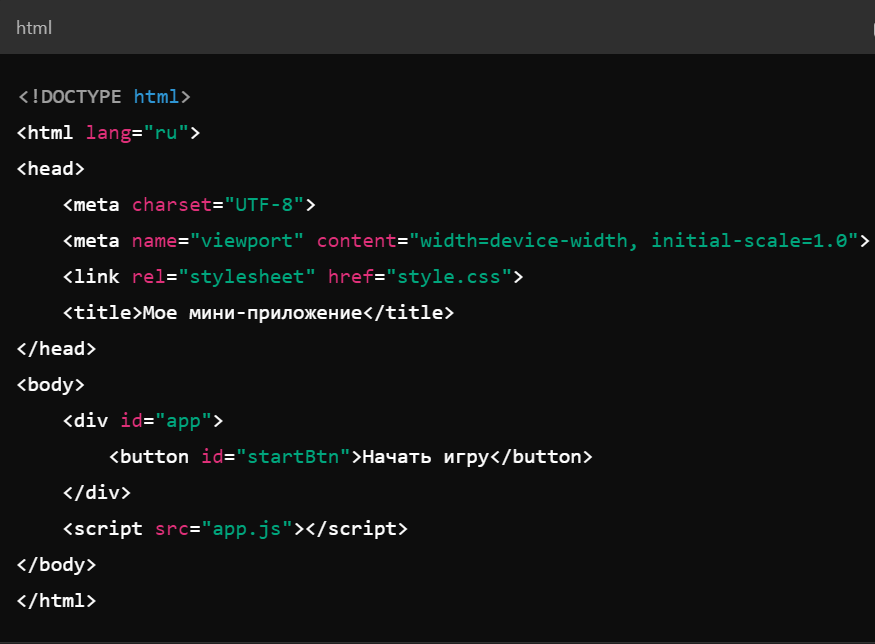
Step #1. Creating a project
First you need to create a telegram mini app project — this will be the base of your mini-application. Text editors or development environments (IDEs) such as VS Code, WebStorm, or even simple editors like Sublime Text will help you with this. They help organize the code and make writing it more convenient. You’ll need to set up a proper test environment to ensure everything works correctly.
Create a folder for your project and create files inside:
index.html — this is the file that will contain the HTML code of your web app. style.css is a file with styles (CSS) for the interface design. app.js — here will be your main code that will control the application logic and interaction with Telegram services.
Step #2. Writing code
When the project structure is ready, you can move on to the code. Let’s look at how to set up your application and make it interactive. You’ll want to ensure your app work correctly with proper debug capabilities.
Connecting to Telegram services
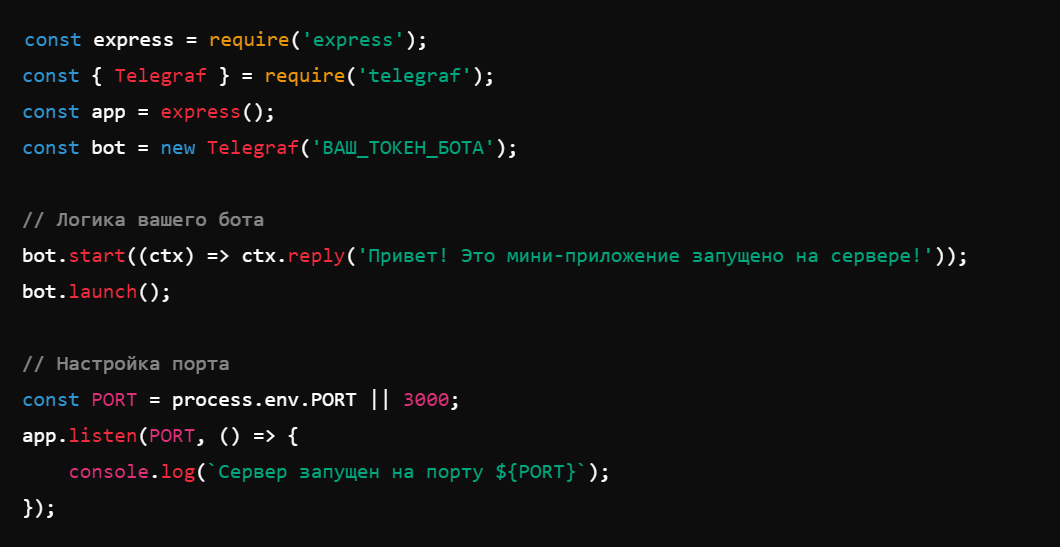
Use the token that you received from the manager and connect it in your code to set up interaction with Telegram. If you are using web technologies, connect the Telegraf library via SDK — it simplifies working with Telegram and makes it easy to send and receive messages through the bot api. This library will help your bot communicate effectively with users and handle authentication processes smoothly.
Install Telegraf using the command:

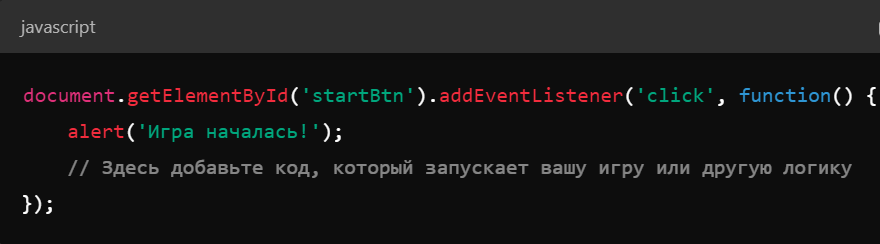
Now create a simple application:
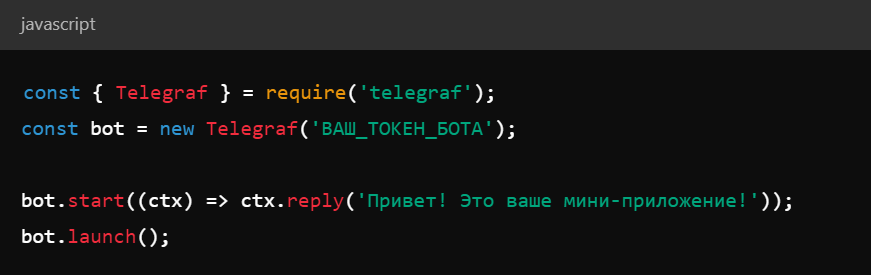
This code launches an application that will greet all users at startup. Then you can add more functions, such as processing text commands or button clicks. You can also integrate Web3 features and wallet functionality for advanced use cases. Your bot will be able to handle various user interactions effectively and send a message to users when needed.
Creating an interface
If your mini app using interactive elements needs to work with users through the interface, you need to add the HTML code to the file index.html . For example, if you have a mini-game, create buttons and input fields with an intuitive UI. Make sure to design the header of the mini app to be clear and functional:
Step #3. Writing application logic
Now let’s move on to the app.js, where all the application logic will be located. For example, you can add button click processing and notification systems. You may also need backend support depending on your application’s complexity. Your bot should respond appropriately to different user commands and actions. Mini apps support seamless authorization, so users can log in easily.
The interface of your mini-application should be simple and intuitive so that users do not get lost and can quickly figure out how to use it within telegram. Consider implementing push notifications to keep users engaged even when they’re not actively using the app.
Step #4. Launch and testing
When everything is ready, you need to test your mini app to see how it works. There are several options here:
Start a local server using Live Server in VS Code or another tool. This will allow you to immediately see the changes and test the functionality. If you want to do everything for real and test the application in Telegram, deploy it on a platform like Heroku or Vercel. This will allow your application to work in real conditions and accept requests from users.
To run the application on the server, create a server file.js and use code like this:
That’s all! Your mini-application is ready for testing and launch. All that remains is to optimize it and add new features so that users get the most pleasure and benefit. And with AdsGram, you can immediately start an advertising campaign to attract more users and get a response to your application.
Debugging and Testing
After developing your Mini App, thorough debugging and testing are crucial before deployment. Telegram provides several tools and methods to help you identify and resolve issues during the development process.
Testing Approaches
Testing can be performed at different stages depending on your setup. For local development, run your application on a local server using tools like Live Server in VS Code. When using the Test Environment, you can access your application via HTTP links and IP addresses for straightforward testing. For production-like testing, deploy to staging platforms such as Vercel, Netlify, or Heroku to test how your Mini App behaves in real Telegram conditions.
Debugging Tools
Modern browsers provide powerful debugging capabilities accessible through developer tools. On Telegram Desktop, right-click inside your Mini App and select “Inspect Element” to access the Console, Network tab, and JavaScript debugger. For mobile debugging, use Chrome’s Remote Debugging (chrome://inspect) for Android or Safari’s Web Inspector for iOS devices.
Common Issues and Solutions
| Issue | Solution |
| API Connection Failures | Verify your bot token is correct and stored properly in environment variables |
| HTTPS Errors | Ensure your hosting provides valid SSL certificates (production requirement) |
| Webhook Problems | Confirm webhook URL is accessible and sending proper responses |
| Cross-Platform Issues | Test on iOS, Android, Desktop, and Web for consistent behavior |
Pre-Deployment Testing Checklist
Before going live, verify that all core functionality works correctly, including user authentication, interactive elements, and API integrations. Ensure error handling provides appropriate user feedback and test across different screen sizes and devices. Monitor loading times and application responsiveness to guarantee smooth performance.
Production Monitoring
Once live, implement monitoring tools like Sentry or LogRocket to track errors and performance. Monitor API response times, track user behavior patterns, and set up alerts for critical issues. Regular monitoring helps you quickly identify and resolve problems, maintaining high-quality service for your users.
HTTPS Requirements and Deployment Considerations
Understanding HTTPS requirements is critical for successful Mini App deployment. Telegram enforces strict security standards in production, and meeting these requirements prevents the most common deployment issues.
HTTPS Requirements by Environment
| Environment | Protocol Support | Certificate Requirements | Use Case |
| Test Environment | HTTP and HTTPS | No certificate needed for HTTP | Local development, testing |
| Production | HTTPS only | Valid SSL/TLS certificate required | Live applications, real users |
Telegram requires HTTPS for all production Mini Apps to encrypt sensitive data –user information, authentication tokens, and API requests. Test Environment allows HTTP URLs and IP addresses (e.g., http://192.168.1.100:3000) for local development. Production Environment strictly requires HTTPS with valid SSL certificates – HTTP URLs will be rejected.
Obtaining SSL Certificates
Most modern hosting platforms provide automatic SSL provisioning at no cost:
- Vercel – Automatic SSL, instant HTTPS URLs, excellent for React/Next.js applications.
- Netlify – Free SSL certificates, continuous deployment, ideal for static sites.
- Heroku – Free SSL on all apps, supports multiple languages, great for full-stack applications.
- AWS/DigitalOcean – Manual SSL configuration required, suitable for advanced developers needing custom infrastructure.
Let’s Encrypt offers free certificates for manual installation. Commercial providers (DigiCert, Sectigo) offer paid certificates typically unnecessary for most Mini Apps.
Common Issues and Solutions
| Issue | Solution |
| Invalid Certificate | Verify installation and expiration using SSL checkers (SSL Labs) |
| Mixed Content | Ensure all resources (images, scripts, APIs) use HTTPS URLs |
| Self-Signed Certificates | Not accepted—use trusted authorities (Let’s Encrypt, DigiCert) |
| Domain Mismatch | Certificate must match domain exactly; use wildcard for subdomains |
Deployment Workflow
Development Phase: Use HTTP with local servers in Test Environment for rapid iteration.
Pre-Production: Deploy to hosting with automatic HTTPS, verify SSL certificate, test with HTTPS in Test Environment, ensure all external resources use HTTPS.
Production: Update BotFather with HTTPS URL, test across platforms, monitor certificate expiration, enable automatic renewal.
Best Practices
Store credentials in environment variables, implement proper CORS headers, use HTTPS for all API communications, and keep SSL certificates current with automatic renewal. When using custom domains, ensure DNS points correctly to your hosting platform – SSL provisioning typically completes within 5-30 minutes.
HTTPS is a fundamental requirement for production Mini Apps. Choosing hosting platforms with automatic SSL provisioning ensures your Mini App meets Telegram’s security standards efficiently.
How do I add a mini-app to Telegram?
When your mini-application is ready and tested, it’s time to add it to Telegram so that users can use it. Understanding how telegram mini apps work is crucial for successful integration.
Step #1. Uploading the project to the server
The first step is to place your mini—application on the server. This is necessary in order for it to be available to users at any time. The server allows your application to run continuously and process requests in real time. Here’s how to do it:
Choose a hosting platform. This can be a free hosting service, for example, Heroku or Vercel, or a paid service like AWS or DigitalOcean. Choose the one that supports your development technology (for example, if you use web technologies, select a server that supports Node.js ). Upload your project to the server. You can place the project in a repository on GitHub or another similar service, and then connect it to the chosen hosting platform. This will allow you to deploy the application automatically with each update.
After downloading, your server will provide an app URL where your mini-application will be available online.
Step #2. Connecting the application via a token
When the project is hosted on the server, the next step is to connect your app to telegram so that Telegram can send requests to your application and receive responses. To do this, you will need the token that you received from the manager when creating the application.
Use this token in your server settings to link it to Telegram. This will allow your application to interact with users via Telegram and forward all user requests to your server. Your bot will serve as the bridge between users and your application. It is important that the server supports a secure connection (HTTPS), as Telegram requires this to ensure security.
Step #3. Setup and application integration
In order for your mini-application to fully work inside Telegram, you need to properly configure the system and add elements that users can interact with. Ensure your app is launched right inside telegram for the best user experience.
Configuring the webhook
A webhook is a special URL to which Telegram will send all messages and commands from users of your application. You will need to set up this URL on the server so that Telegram can direct requests directly to your application. This webhook will allow your bot to receive real-time updates.
Setting up buttons and commands
To make it easy for users to launch your telegram mini app, add intuitive buttons and commands. For example, these may be the “Launch”, “Open” or other buttons that correspond to the functionality of your application. Consider adding a menu button for easy navigation, which can also serve as a bot menu button. These buttons will allow users to interact with your mini-application directly in a chat, without having to enter text commands. The telegram interface should provide seamless interaction. Your bot should handle all these interactions smoothly.
Set up commands that will activate certain actions in your application, such as launching a game or calling for help. Make sure to handle each parameter correctly.
Processing commands and actions
It is important that your application responds correctly to user actions. When the user clicks a button or enters a command, the application must send an appropriate response or activate the desired function of the mini-application. This ensures smooth and convenient user interaction with your application. Your bot should be programmed to handle various scenarios and edge cases.
Step #4. Testing and launch
When everything is set up, it’s time to test your mini-application:
Make sure that the server is working correctly and is available online via HTTPS. Log in to Telegram and open your application. Click on the buttons that you have configured and make sure that the application works as you expected. Make sure that the application responds correctly to commands and interacts with the system.
If everything is configured correctly, your mini-application will be completely ready and available to all Telegram users. You will be able to monitor how users interact with the app and add new features and capabilities.
Setting up your mini app with BotFather
After completing the development process, you need to configure your application properly. When you build a telegram mini app, it’s essential to follow the right steps. Once your app is ready, you can proceed with the final configuration.
Go back to BotFather and configure your mini-app settings. You can create a direct link that users can share, and ensure your app works well in telegram groups. The telegram platform supports both Android and iOS devices, so make sure your app is compatible with both systems.
Consider the telegram UI guidelines when designing your app. Users should have a smooth experience when opening the mini app, regardless of their device type. Make sure to optimize your mini app to the maximum potential and ensure app to the maximum available functionality is utilized.
Users can access your app directly through the telegram messenger interface for the best experience. Once your app is expanded with all necessary features, it will provide a comprehensive solution for your users.
Promotion of a mini-application with AdsGram
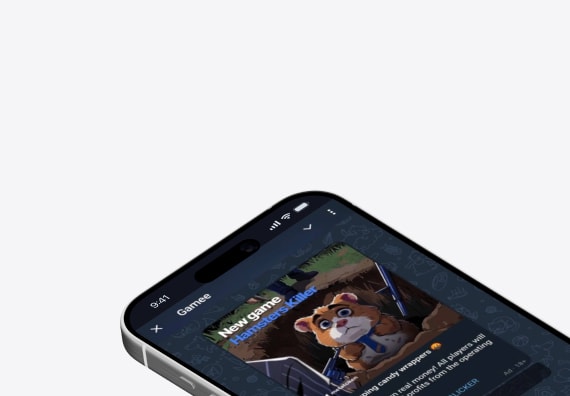
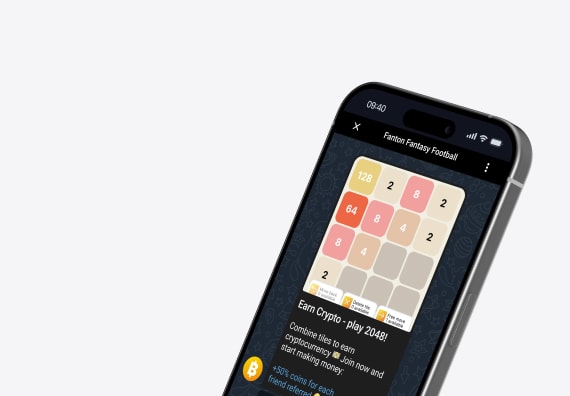
Now that your mini-app is active, you can use AdsGram to promote it. Our platform allows you to set up ads specifically for Telegram mini-apps and games. You can also utilize telegram ads for broader reach. You can:
Create an advertising campaign to attract more users to your app. Use geotargeting to serve ads in the right regions and get high-quality traffic. Optimize ad formats for games and mini-applications such as rewarded videos or banners to increase user engagement.
With AdsGram, you can effectively promote your app and attract new users. Good luck in launching and promoting your mini-app!