नमस्ते, टेक्नोलॉजी के शौक़ीन दोस्तो! क्या आप Telegram Mini Apps की दिलचस्प दुनिया में क़दम रखने के लिए तैयार हैं? चाहे आप अनुभवी डेवलपर हों या अभी शुरुआत कर रहे हों, यह गाइड इन डायनामिक ऐप्लिकेशन को समझने में आपकी मदद करेगी। हम बुनियादी सेटअप से लेकर उन्नत फ़ीचर्स तक सब कुछ कवर करेंगे, व्यावहारिक उदाहरणों और काम की सलाह के साथ।
Telegram Mini Apps असल में क्या हैं?
मिनी ऐप एक छोटा वेब ऐप्लिकेशन है, जो Telegram के भीतर चलता है और Telegram बॉट के ज़रिए खुलता है। इन ऐप्स की मदद से उपयोगकर्ता Telegram छोड़े बिना अलग-अलग सेवाओं का इस्तेमाल कर सकते हैं। Bot API और वेब ऐप्स के बिल्ट-इन सपोर्ट की बदौलत मिनी ऐप Telegram के साथ सहज ढंग से जुड़ता है और तेज़ी से काम करता है।
जब Telegram बॉट मिनी ऐप खोलता है, तो ऐप को उपयोगकर्ता और उस चैट के बारे में डेटा मिलता है, जहाँ से उसे खोला गया, और इस डेटा की मदद से वह व्यक्तिगत अनुभव दे सकता है। सुरक्षा के लिए इस डेटा (initData) की प्रामाणिकता आपके सर्वर पर बॉट टोकन की मदद से जाँचनी चाहिए — इसी से उपयोगकर्ता की पहचान की पुष्टि होती है।
इस तरह Telegram मिनी ऐप्स टैक्सी बुक करने से लेकर गेम खेलने तक, हर काम को सीधे Telegram में तेज़ और आसान बनाते हैं और उपयोगकर्ता को सहज अनुभव देते हैं।
शुरुआत: डेवलपमेंट एनवायरनमेंट तैयार करें
अपने Telegram Mini App की कोडिंग शुरू करने से पहले — चाहे वह बॉट के ज़रिए खुलने वाला ऐप हो या बॉट का मुख्य मिनी ऐप — पक्का करें कि आपके पास सही टूल्स हैं:
- डेवलपमेंट टूल्स: JavaScript सपोर्ट वाला कोई अच्छा टेक्स्ट एडिटर या IDE इस्तेमाल करें, ताकि Telegram के इंटरफ़ेस में खुलने वाले रिस्पॉन्सिव मिनी ऐप्स बना सकें।
- लोकल सर्वर: सुरक्षित HTTPS सर्वर सेट करें, ताकि टेस्ट कर सकें कि मिनी ऐप पूरी स्क्रीन पर फैलने (expand) पर और अपने दिखने वाले हिस्से (viewport) में कैसे व्यवहार करता है।
- ब्राउज़र डेवलपर टूल्स: डीबगिंग के लिए ज़रूरी हैं — इनसे पता चलता है कि ऐप उपयोगकर्ता की कार्रवाइयों पर कैसी प्रतिक्रिया देता है, बंद होने या दोबारा लोड होने पर क्या होता है, और अलग-अलग चैट्स या Telegram के अलग-अलग वर्ज़न में वह कैसे काम करता है।
अलग-अलग स्थितियों में अच्छी तरह टेस्ट करने से यह पक्का होता है कि आपका मिनी ऐप हर स्थिति में ठीक से काम करे।
सफलता के लिए डिज़ाइन
आकर्षक मिनी ऐप बनाना सिर्फ़ फ़ंक्शनैलिटी का मामला नहीं — इसमें दिखावट और यूज़र अनुभव भी उतने ही अहम हैं:
- विज़ुअल तालमेल: Telegram की साफ़-सुथरी डिज़ाइन शैली से मेल बनाए रखें।
- रिस्पॉन्सिव डिज़ाइन: पक्का करें कि ऐप हर डिवाइस पर अच्छा दिखे।
- त्रुटियों को संभालना और ऑफ़लाइन सपोर्ट: हर स्थिति के लिए तैयार रहें, ताकि उपयोगकर्ता का अनुभव कभी न बिगड़े।
परफ़ॉर्मेंस बेहतर करने की सलाह
ऐप को बिजली की रफ़्तार से चलाने के लिए इन पर ध्यान दें:
- लोडिंग स्पीड: धीरे-धीरे लोडिंग (progressive loading) और संसाधनों की असरदार कैशिंग जैसी तकनीकों से शुरुआती लोडिंग का समय कम करें — भारत में बहुत से उपयोगकर्ता धीमे मोबाइल इंटरनेट पर होते हैं, इसलिए यह ख़ास तौर पर अहम है।
- रनटाइम परफ़ॉर्मेंस: मेमोरी का सही प्रबंधन करें, एनिमेशन स्मूद रखें, इंटरफ़ेस को रिस्पॉन्सिव बनाएँ और ध्यान रखें कि ऐप बैटरी ज़्यादा न खाए — ख़ासकर बजट Android फ़ोन पर, जो भारत में सबसे आम हैं।
उन्नत फ़ीचर्स और क्षमताएँ
उपयोगकर्ताओं का जुड़ाव बढ़ाने के लिए अपने मिनी ऐप में उन्नत फ़ीचर्स इस्तेमाल करें — जैसे कीबोर्ड बटन से खुलने वाले मिनी ऐप्स, जो सीधे Telegram के भीतर लॉन्च होते हैं। इनलाइन मोड में Telegram क्लाइंट अपने-आप बॉट का यूज़रनेम और तय की गई इनलाइन क्वेरी इनपुट फ़ील्ड में डाल देता है। मिनी ऐप डिवाइस की स्थिति (ओरिएंटेशन) का डेटा भी पा सकता है, जिसमें चुंबकीय उत्तर दिशा के सापेक्ष डिवाइस का झुकाव शामिल है, और बॉट के साथ सुरक्षित रूप से डेटा का आदान-प्रदान कर सकता है।
आम गलतियों से बचें
दूसरों की गलतियों से सीखें, ताकि आप मुश्किलों से बच सकें:
- बहुत जटिल समाधान? बिल्कुल नहीं! चीज़ें आसान रखें।
- परफ़ॉर्मेंस की दिक़्क़तें? सिरदर्द बनने से पहले ही उन्हें ठीक करें।
डिज़ाइन की आम गलतियों में उलझा हुआ नेविगेशन और अलग-अलग जगह अलग स्टाइल शामिल हैं — इन पर ख़ास नज़र रखें!
आगे की राह: मिनी ऐप्स का भविष्य
टेक्नोलॉजी लगातार बदल रही है, और अलग दिखने वाला Telegram मिनी ऐप बनाने का यह बढ़िया समय है। नए फ़ीचर्स मिनी ऐप के साथ इंटरैक्शन को बेहतर बनाते हैं: उपयोगकर्ता ऐप के भीतर एक क्लिक से दमदार कार्रवाइयाँ कर सकते हैं। जब उपयोगकर्ता Telegram इंटरफ़ेस में मिनी ऐप खोलते हैं — चाहे वह बॉट का मुख्य मिनी ऐप हो या इनलाइन मोड से खुलने वाला — बॉट का यूज़रनेम अपने-आप जुड़ जाता है।
Bot API 8.0 (नवंबर 2024) के बाद मिनी ऐप स्क्रीन का ओरिएंटेशन लॉक कर सकता है और चुंबकीय उत्तर दिशा के सापेक्ष डिवाइस का झुकाव पता कर सकता है। यह डेटा सिर्फ़ मिनी ऐप्स को मिलता है। Telegram चैट की जानकारी भी प्रोसेस करता है और बॉट का यूज़रनेम व तय की गई क्वेरी अपने-आप जोड़ता है। इन टूल्स की मदद से बॉट के मिनी ऐप्स ज़्यादा डायनामिक बनते हैं और यूज़र अनुभव का गहरा हिस्सा बन जाते हैं।
शुरुआत करें
1. डेवलपमेंट एनवायरनमेंट सेट करना
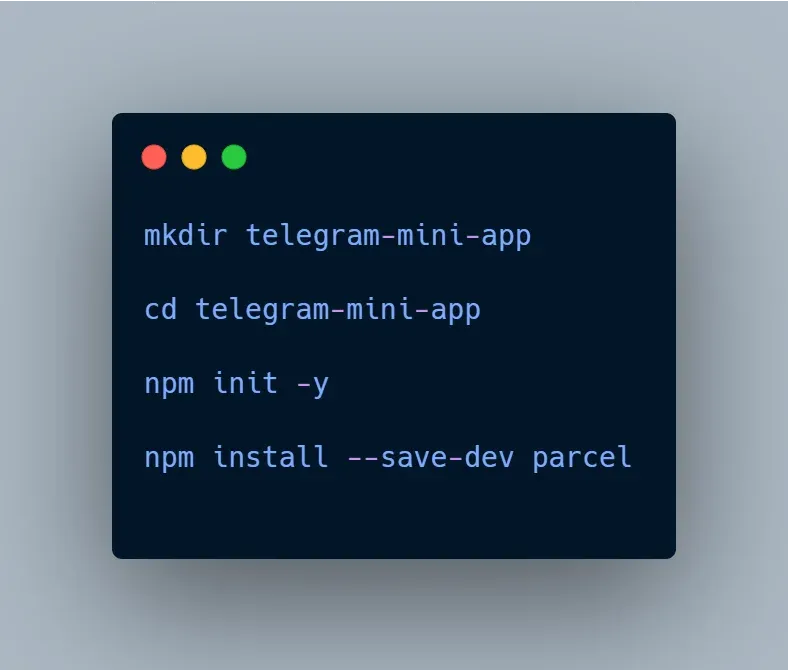
सबसे पहले एक नया प्रोजेक्ट बनाएँ और उसका बुनियादी ढाँचा तैयार करें:
bashmkdir telegram-mini-appcd telegram-mini-appnpm init -ynpm install --save-dev parcel
बुनियादी HTML ढाँचा बनाएँ:
html<!DOCTYPE html><html><head> <meta charset="UTF-8"> <meta name="viewport" content="width=device-width, initial-scale=1.0"> <title>Telegram Mini App</title> <script src="https://telegram.org/js/telegram-web-app.js"></script></head><body> <div id="app"></div> <script src="./src/app.js"></script></body></html>
2. Telegram API को इनिशियलाइज़ करना
javascript// app.jsconst tg = window.Telegram.WebApp;
class TelegramApp { constructor() { this.initApp(); this.setupEventListeners(); }
initApp() { // Telegram को बताएँ कि Mini App तैयार है tg.ready(); // Mini App को पूरी ऊँचाई तक फैलाएँ tg.expand(); // ज़रूरत हो, तो बंद करने से पहले पुष्टि माँगना चालू करें tg.enableClosingConfirmation(); }
setupEventListeners() { // viewport (दिखने वाले हिस्से) में बदलाव संभालें tg.onEvent('viewportChanged', this.handleViewportChange); // थीम में बदलाव संभालें tg.onEvent('themeChanged', this.handleThemeChange); }
handleViewportChange = () => { const isExpanded = tg.isExpanded; // viewport की स्थिति के हिसाब से अपना UI बदलें }
handleThemeChange = () => { this.applyTheme(tg.colorScheme); }}
उपयोगकर्ता के डेटा के साथ काम करना
1. उपयोगकर्ता की जानकारी पाना
javascriptclass UserManager { constructor() { this.user = tg.initDataUnsafe.user; }
getUserInfo() { return { id: this.user.id, firstName: this.user.first_name, lastName: this.user.last_name, username: this.user.username, languageCode: this.user.language_code, isPremium: this.user.is_premium }; }
async verifyOnServer() { // initData को जाँच के लिए अपने सर्वर पर भेजें — बॉट टोकन कभी भी क्लाइंट के कोड में न रखें const response = await fetch('/api/verify-init-data', { method: 'POST', headers: { 'Content-Type': 'application/json' }, body: JSON.stringify({ initData: tg.initData }) }); return response.ok; }}
// सर्वर पर (Node.js): initData की प्रामाणिकता की जाँचconst crypto = require('crypto');
function verifyInitData(initData, botToken) { const params = new URLSearchParams(initData); const hash = params.get('hash'); params.delete('hash');
// hash को छोड़कर सभी फ़ील्ड, key के हिसाब से क्रम में, "key=value" रूप में const dataCheckString = [...params.entries()] .sort(([a], [b]) => (a < b ? -1 : 1)) .map(([key, value]) => ${key}=${value}) .join('\n');
const secretKey = crypto.createHmac('sha256', 'WebAppData').update(botToken).digest(); const calculatedHash = crypto.createHmac('sha256', secretKey).update(dataCheckString).digest('hex');
return calculatedHash === hash;}
2. Cloud Storage के साथ काम करना
javascriptclass CloudStorage { // Telegram का CloudStorage callback के ज़रिए नतीजा देता है, इसलिए उसे Promise में लपेटा गया है saveData(key, value) { return new Promise((resolve) => { tg.CloudStorage.setItem(key, JSON.stringify(value), (error, stored) => { if (error) { console.error('Cloud storage save error: ', error); resolve(false); } else { resolve(stored); } }); }); }
getData(key) { return new Promise((resolve) => { tg.CloudStorage.getItem(key, (error, data) => { if (error) { console.error('Cloud storage retrieve error: ', error); resolve(null); return; } // अगर key मौजूद नहीं है, तो ख़ाली स्ट्रिंग लौटती है try { resolve(data ? JSON.parse(data) : null); } catch (parseError) { resolve(null); } }); }); }}
उन्नत UI कंपोनेंट्स
1. Main Button का प्रबंधन
javascriptclass MainButtonManager { constructor() { this.button = tg.MainButton; }
setup(text, color = '#2cab37') { this.button.setText(text); this.button.setParams({ color: color, text_color: '#ffffff', is_active: true, is_visible: true }); }
showLoading() { this.button.showProgress(false); }
hideLoading() { this.button.hideProgress(); }
disable() { this.button.setParams({ is_active: false }); }
enable() { this.button.setParams({ is_active: true }); }}
2. पॉप-अप नोटिफ़िकेशन
javascriptclass PopupManager { static showAlert(message) { tg.showPopup({ title: 'Alert', message: message, buttons: [{ type: 'ok' }] }); }
static showConfirm(message, onConfirm, onCancel) { // showPopup दबाए गए बटन का id callback में देता है (Promise नहीं लौटाता) tg.showPopup({ title: 'Confirmation', message: message, buttons: [ { // अपना टेक्स्ट सिर्फ़ 'default' और 'destructive' बटन पर दिखता है type: 'default', text: 'Confirm', id: 'confirm' }, { type: 'cancel', id: 'cancel' } ] }, (buttonId) => { if (buttonId === 'confirm') { onConfirm(); } else { onCancel(); } }); }}
भुगतान संभालना
javascript// सर्वर पर: बॉट Bot API के createInvoiceLink मेथड से इनवॉइस लिंक बनाता है, जैसे इन पैरामीटर्स के साथ:// {// title: 'Product Title',// description: 'Product Description',// payload: 'unique_payload',// provider_token: 'YOUR_PROVIDER_TOKEN', // डिजिटल सामान के लिए इसे ख़ाली छोड़ें और currency: 'XTR' (Telegram Stars) रखें// currency: 'USD',// prices: [{ label: 'Product', amount: 1000 }] // राशि सेंट में// }
class PaymentManager { async createInvoice() { try { // सर्वर से तैयार इनवॉइस लिंक लें const response = await fetch('/api/create-invoice', { method: 'POST' }); const { invoiceLink } = await response.json();
// openInvoice भुगतान की स्थिति callback में देता है return await new Promise((resolve) => { tg.openInvoice(invoiceLink, (status) => { // status: 'paid', 'cancelled', 'failed' या 'pending' resolve(status === 'paid'); }); }); } catch (error) { console.error('Payment error: ', error); return false; } }}
नेविगेशन लागू करना
javascriptclass NavigationManager { constructor() { this.backButton = tg.BackButton; this.pages = new Map(); this.currentPage = null; }
registerPage(name, component) { this.pages.set(name, component); }
navigateTo(pageName) { if (this.pages.has(pageName)) { if (this.currentPage) { this.backButton.show(); } this.currentPage = pageName; // अपने पेज का कंपोनेंट रेंडर करें this.renderPage(pageName); } }
goBack() { // "पीछे जाएँ" का अपना लॉजिक यहाँ लिखें }}
सबसे अच्छे तरीके और उन्नत सलाह
1. त्रुटियों को संभालना
javascriptclass ErrorHandler { static handle(error, context = '') { console.error(`Error in ${context}: `, error); // अपनी एनालिटिक्स सेवा में लॉग करें this.logToAnalytics(error, context); // उपयोगकर्ता को समझ में आने वाला संदेश दिखाएँ PopupManager.showAlert('Something went wrong. Please try again.'); }
static logToAnalytics(error, context) { // एनालिटिक्स में लॉगिंग का अपना तरीका यहाँ लिखें }}
2. परफ़ॉर्मेंस ऑप्टिमाइज़ेशन
javascriptclass PerformanceOptimizer { static debounce(func, wait) { let timeout; return function executedFunction(...args) { const later = () => { clearTimeout(timeout); func(...args); }; clearTimeout(timeout); timeout = setTimeout(later, wait); }; }
static setupLazyLoading() { // तस्वीरों और भारी कंपोनेंट्स के लिए lazy loading लागू करें }}
3. थीम का प्रबंधन
javascriptclass ThemeManager { constructor() { this.isDark = tg.colorScheme === 'dark'; this.themeParams = tg.themeParams; }
applyTheme() { document.documentElement.style.setProperty('--bg-color', this.themeParams.bg_color); document.documentElement.style.setProperty('--text-color', this.themeParams.text_color); document.documentElement.style.setProperty('--hint-color', this.themeParams.hint_color); document.documentElement.style.setProperty('--link-color', this.themeParams.link_color); document.documentElement.style.setProperty('--button-color', this.themeParams.button_color); document.documentElement.style.setProperty('--button-text-color', this.themeParams.button_text_color); }}
टेस्टिंग और डीबगिंग
टेस्ट एनवायरनमेंट सेट करना
javascriptclass TestEnvironment { static setupMockTelegram() { if (!window.Telegram) { window.Telegram = { WebApp: { ready: () => {}, expand: () => {}, initDataUnsafe: { user: { id: 12345, first_name: 'Test', last_name: 'User', username: 'testuser', language_code: 'en' } } } }; } }}
निष्कर्ष
सफल Telegram Mini App बनाने के लिए सिर्फ़ कोडिंग काफ़ी नहीं — इसके लिए सोच-समझकर बनाया गया UI, यूज़र अनुभव की समझ और Telegram प्लेटफ़ॉर्म के साथ सावधानी से किया गया इंटीग्रेशन ज़रूरी है। सबसे अच्छे तरीकों का पालन करके आप ऐसा मिनी ऐप बना सकते हैं, जो न सिर्फ़ अच्छा काम करे, बल्कि Telegram का ही स्वाभाविक हिस्सा लगे।
अपने मिनी ऐप्स को असरदार बनाने के लिए हमेशा:
- Bot API के साथ साफ़ आर्किटेक्चर से शुरुआत करें
- सुरक्षित ऑथेंटिकेशन लागू करें और टोकन को सुरक्षित रखें
- कंटेंट को व्यक्तिगत बनाने के लिए क्वेरी पैरामीटर समझदारी से इस्तेमाल करें
- अलग-अलग डिवाइस के लिए रिस्पॉन्सिव UI बनाएँ
- इनलाइन मोड और अटैचमेंट मेन्यू से खुलने वाले मिनी ऐप्स जैसे फ़ीचर्स सपोर्ट करें
- मिनी ऐप से आने वाले इवेंट्स को सही ढंग से संभालें
- ज़रूरत हो, तो यह पता करने की सुविधा रखें कि ऐप होम स्क्रीन पर जोड़ा गया है या नहीं
- यूज़रनेम अपने-आप जोड़ें और बॉट के ज़रिए इंटरैक्शन मैनेज करें
चाहे आप कोई छोटा यूटिलिटी टूल बना रहे हों या जटिल समाधान, Telegram प्लेटफ़ॉर्म आपको ज़रूरी लचीलापन और ताक़त देता है। लगातार सुधार करते रहें, अपडेट रहें और उपयोगकर्ताओं की असली ज़रूरतें सुरक्षित और सलीक़े से पूरी करने के लिए Telegram मिनी ऐप्स के फ़ीचर्स का इस्तेमाल करें।